Thursday, June 26, 2008

Creating MySites Programmatically

Instead of asking every user to click on "My Site" and have the site provisioned for them it's sometimes nice to already have the site created... or create it as part of the Employee Intake process. This is especially true if the My Site plays a role in a custom application as it did for one of my clients.

Here's a snippet to get you started:


using (SPSite site = new SPSite(url))
{
UserProfileManager profileManger = new UserProfileManager(ServerContext.GetContext(site));
UserProfile profile = profileManger.GetUserProfile(@"domain\user");
profile.CreatePersonalSite();
}


However, I kept getting the following error message:
You do not have access to create this personal site.

Now.. I'm an admin on the box and within SharePoint but it turns out you will see this error if your user does not have access to Shared Services. You'll either need to impersonate a higher user using SPSecurity or, in my case, simply right click on your command line application and choose "Run as..." and enter the credentials for your Shared Services administrator.

Thursday, June 12, 2008

Denying User Access At The Site Level

It's a pretty well known fact that SharePoint cannot deny access for a user below the Web Application level as shown in the screenshot below. Sadly there will be no code samples for this one as it's pretty proprietary stuff.
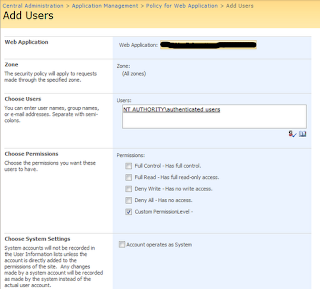


Well, one of my clients had this exact problem. Except that the answer "Sorry, SharePoint doesn't do that." didn't solve the underlying business problem. Here is a scenario and the provided "Out-Of-The-Box Solution".
  1. Users are given access to a site through a single group "SharePoint Users".
  2. This "SharePoint Users" group is used throughout the rest of the site collection so simply modifying it is not an option.
  3. John Doe is a member of this "SharePoint Users" group but because of an "Ethical Wall" (Law Firm jargon for blocking one lawyer from seeing another lawyers documents) John Doe cannot have access to this site.
After talking with a Microsoft Employee at a training session the recommended approach is to either create smaller groups... ie: "SharePoint Users" and "SharePoint Users Without John" and to maintain these at the site collection level or to simply remove the "SharePoint Users" group from the site and add all your users directly.

We chose to do the latter in an automated fashion. What we ended up with is as follows.
  1. A custom SQL table that holds the list of people that should be denied access to a particular site.
  2. A Timer Job that constantly ensures that those people are actually denied.
  3. A configuration panel in Central Administration to maintain which web applications are using the functionality and to hold configuration options.
  4. A data input panel built into each SharePoint site to allow administrators to deny users and to view who is currently denied.
The bulk of the code exists in the Timer Job. The Timer Job is responsible for breaking the inheritance, looping through all of the current security, removing groups and readding users with the proper security, and finally removing all the denied users.

This solution has the following pluses
  • Will loop through both SharePoint Groups and AD Groups no matter how complicated the nested group structure is
  • Makes a manual process somewhat automated to ensure less user error
  • Although it creates an administrative problem for adding new users (users will not have acecss when they should) it does protect against the more dangerous scenario (a user does have access when they shouldn't)

Wednesday, June 11, 2008

Hiding Empty Publishing Fields in a Page Layout

Most of the time when you're rendering web content that content will exist in a container or have a header or a footer, etc. If you're rendering an HTML publishing field within SharePoint the user could have simply left the field blank (unless you make the field required of course). In this case you probably don't want to render the container/header/footer if there isn't going to be any content. So let's get down to business...

First you have you're normal code


<h3>Publishing Header</h3>
<publishingwebcontrols:richhtmlfield id="PublishingContent1" fieldname="PublishingContent" runat="server"></publishingwebcontrols:richhtmlfield>


This is fine but we don't want "Publishing Header" showing if there is no content in the field. So what do we do? First drop the following code at the beginning of the "PlaceHolderMain" in your custom page layout.

<script runat="server">

public static bool FieldHasValue(SPListItem item, string fieldName)
{
if (item.Fields.ContainsField(fieldName) && item[fieldName] != null)
{
string html = item[fieldName].ToString();
Regex regex = new Regex(@"\s]+))?)+\s*|\s*)/?>", RegexOptions.Singleline);
MatchCollection matches = regex.Matches(html);
foreach (Match match in matches)
{
html = html.Replace(match.Value, "");
}

html = html.Replace("\n", "").Trim();
return (html.Length > 0);
}

return false;
}

</script>

Now we just have to use some inline ASP to check the field before we do our rendering.

<%

if (FieldHasValue(item, "PublishingContent"))
Response.Write("<h3>Publishing Header</h3>");

%>

<publishingwebcontrols:richhtmlfield id="PublishingContent1" fieldname="PublishingContent" runat="server"></publishingwebcontrols:richhtmlfield>

Tuesday, June 10, 2008

Deleting a Page Layout or Master Page that is no longer referenced

There is a fairly well known bug that prevents you from deleting both page layouts and master pages even though they are no longer in use. If you do try to delete either a page layout or master page you will receive the following error:

"This item cannot be deleted because it is still referenced by other pages. "

There is a workaround for this problem but it requires SharePoint designer. Here is my similar solution except that no SharePoint designer is required.
  1. Browse to the "Master Page Gallery".
  2. Select "Actions" and "Open with Windows Explorer"
  3. Right click on the white area and select "New" > "Folder"
  4. Drag the page layout or master page into the new folder
  5. Right click on the new folder and select "Delete"
  6. Confirm the box
Done!

Tuesday, January 8, 2008

Properly Checking Metadata in SharePoint Workflow

Since you want your SharePoint workflow to be as fault tolerant as possible it is always a good idea to use the following method when you are accessing fields from an SPListItem. This is especially true if they are custom fields that are deployed via a Site Column or Content Type as your workflow will receive nasty errors such as "Null Reference Exception" and "Array Out of Bounds Exception" otherwise.


if (workflowProperties.Item.Fields.ContainsField("Custom Field") && workflowProperties.Item["Custom Field"] != null && workflowProperties.Item["Custom Field"].Equals("Some Value"))
{
// continue with rest of code
}

Updating an Underlying Page Layout

Just a quick post as someone recently asked me this question and it is fairly hidden in the site.

Although changing the page layout of an existing page could be considered equivalent pulling the carpet out from under something it is possible none-the-less. Keep in mind however that if any data was displayed on the page that is not accounted for in the new page layout then that information will no longer be seen by your users. Also if you had web part zones the web parts will probably need reorganizing as they will fall into different zones.
  1. Bring up the publishing toolbar by selecting Site Actions > Edit Page
  2. From the publishing toolbar select Page > Page Settings
  3. From the page settings screen you can select a new page layout and save your changes by clicking "Ok"

Thursday, December 20, 2007

DCOM Errors

This is an issue that I've ran in to multiple times now. I haven't figured out the exact reason that these problems start occurring but it seems to be related to running Windows Update.

Here's the issue:

You'll start seeing lots of DCOM errors in your System Log, usually one every minute or so. These errors will look something like this:

The application-specific permission settings do not grant Local Activation permission for the COM Server application with CLSID
{INSERT_GUID_HERE}
to the user DOMAIN\MOSSService SID (INSERT_SID_HERE). This security permission can be modified using the Component Services administrative tool.Basically your MOSS Service account doesn't have the necessary permissions to one of the DCOM services. So let's fix that.

  1. Go to Start > Run. Type "regedit". Click OK.
  2. Select the root node "My Computer".
  3. Select Edit > Find. And paste your GUID from the error in your system log into the search box and click "Find Next". Keep searching until you have a folder on the left and not the actual GUID itself.
  4. Now you know the name of the service that's lacking permissions in my case it was OSearch.
  5. Now go to Start > Administrative Tools > Component Services > Expand Component Services > Expand Computers > Expand DCOM Config
  6. Right click the service you found in my case "OSearch" and choose properties.
  7. Select the "Security" tab.
  8. Under "Launch and Activation Permissions" click "Edit..."
  9. Add your MOSS Service Account and ensure that he has both "Local Launch" and "Local Activation" permissions.
Now you can back up and clear your event log and enjoy an error free event log once again.